Neo4j Intra-cluster Encryption
I’ve recently spent some time getting Intra-cluster encryption up and running on a Neo4j Causal Cluster, both with Self-Signed certificates, and proper ones. Largely, due to the way SSL works, in particular with respect to a cluster – it’s not as straight forward as it might seem, and there are a few things which can help point you in the right direction to get through it!
Things to know:
- We’re on Windows for this (Server 2016) – this means that if you’re doing it on *nix, it’s probably easier 🙂
- This is going to look at self-signed setup, BUT we’ll have a look at “what to look for”
- If your cluster is all on one machine, this is easier, and we’ll be looking at 3 independent VMs for this case.
- We’re not going to cover setting up the cluster aside from the SSL side of things, and only intra-cluster communications.
Step One – Make sure your cluster is working
This might sound stupid, because ‘obvs’ it is – but check it’s actually working, and not just looking like it. To do this is pretty simple, connect to your cluster and execute something like:
CREATE (n:TestNode);
If that works, then we’re all good. Note – it does need to be a bit of cypher that will cause an update to occur (CREATE/MERGE/etc) so the transaction is committed across the cluster.
Step Two – Create your SSL certificates
This is the painful bit, and it’s largely because we’re using Self-signed – if you have your own certificates, you can skip this step.
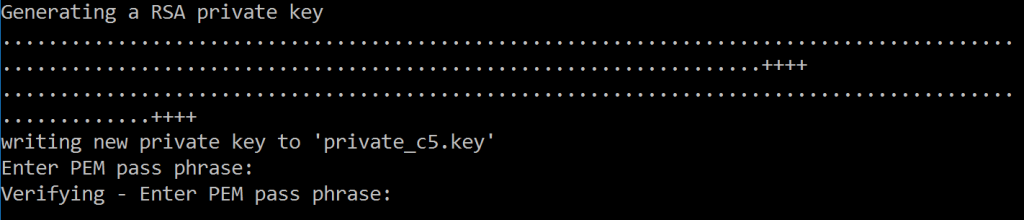
We’re going to need OpenSSL – I would recommend getting the windows one in this case, so we can also run on our servers (which are Server 2016 remember!). Wherever you are, you’ll need to generate 3 key/crt pairs – one for each server, and to do that, we execute:
openssl.exe req -x509 -sha256 -days 365 -newkey rsa:4096 -keyout private_c#.key -out certificate_c#.crt
(Where ‘#’ is the number of the server, i.e. 1,2 or 3). Of course, you can use whatever naming convention you want!
When you run this, you’ll be asked a lot of questions – which need to filled in, so let’s quickly have a look at them.
First off – you’re going to be asked for a password – don’t forget this! Use a password manager, or as it’s just a simple test case (right?) use something like ‘neo’ – there are no restrictions.
After that we get on to the Distinguished Name (DN) part of the certificate:
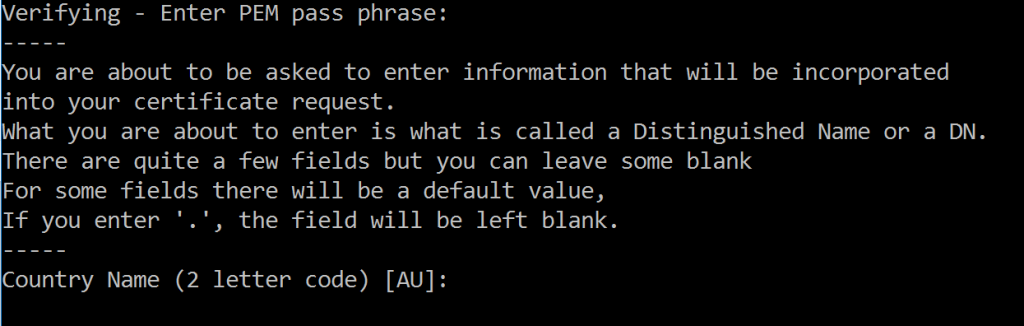
It asks for 7 bits of information, and whilst saying that you can leave some blank, it doesn’t mention which ones. But 7 isn’t too much, and you can always ‘fake’ it as this is for testing purposes.
Let’s look at these quickly
- Country Name
- That’s your Alpha-2 code ISO-3166-1, i.e. GB, US, AX etc
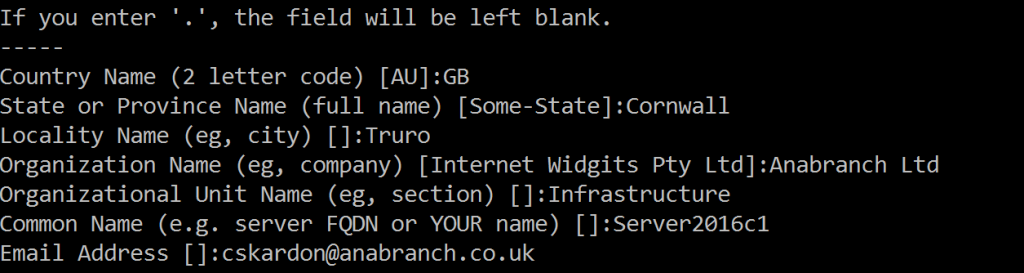
- State or Province Name
- Could be something like Texas, Washington, Cornwall, Devon
- Locality Name
- Your local town/city
- Organization Name
- This is your company name, which might well be just your name for these purposes
- Organizational Unit Name
- The department basically – I pretty much always put Infrastructure or CTU – because I watched 24 all those years ago
- Common Name
- So this is I think important – this should be the Fully Qualified Domain Name of your server. In my case, this is ‘Server2016c1’. If you want to provide multiple Domain Names that you can use (aliases??) you’ll need to generate the certificates in other ways. But for our use case, one is fine.
- Email Address
- Your email address – of course, you can use “a@a.com” if you want, this is just a Self Signed cert.
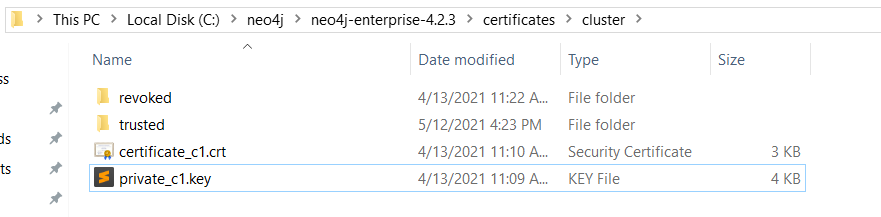
PHEW! All done. When these are filled in, you’ll have a .crt and a .key file in your folders. Personally, I would now repeat this for the other 2 servers as well (whilst you’re there – as you can just press UP on the keyboard).
Install the Certificates
OK, now we have our certificates, it’s time to put them in the right place. Certificates in Neo4j (by default) go into a ‘certificates’ folder just off of the root install. Of course, this can be configured in your neo4j.conf file. But for this, we’re sticking with the basic locations.
Let’s have a look at the config first
dbms.ssl.policy.cluster.private_key_password=neo
dbms.ssl.policy.cluster.enabled=true
dbms.ssl.policy.cluster.base_directory=certificates/cluster
dbms.ssl.policy.cluster.private_key=private_c1.key
dbms.ssl.policy.cluster.public_certificate=certificate_c1.crt
dbms.ssl.policy.cluster.client_auth=REQUIRE
dbms.ssl.policy.cluster.trusted_dir=trusted
dbms.ssl.policy.cluster.revoked_dir=revoked
dbms.ssl.policy.cluster.verify_hostname=true
Now. A few ‘things to note’ bits:
dbms.ssl.policy.*.private_key_passwordneeds to be before thedbms.ssl.policy.*.private_keysetting, if you put it after, the server won’t start.- The
trusted_dirandrevoked_dirare relative to thebase_directorysetting. - For a cluster – you want
client_authto beREQUIRE– anything else leaves you open to Man In The Middle attacks. - The
verify_hostnamesetting means we’ll be checking that the hostname (CN) on the certificates is correct.
You can share certificates, i.e. for HTTPS and Bolt endpoints, you might have the same certificate, so, they would both be configured with the same base_directory. For the Cluster – I would recommend not sharing, and using a separate certificate and base_directory.
Let’s quickly chat about the 3 settings at the bottom, first client_auth – I said you want it to be REQUIRE – but what does this mean in practice? Well – you have another 2 options here – OPTIONAL and NONE. NONE means that the server (C1 in this case) won’t check the incoming certificates from other ‘clients’ – so any client could connect. This makes sense for a server over HTTPS or Bolt, where you don’t control the client certificates, but intra-cluster – this would lead to a problem. OPTIONAL is similar, in the sense that it can check the client, but doesn’t have to. The only benefit this gives is that you can revoke a client. But that client could always just remove it’s certificate and then it would be once again able to access the server – personally, I would just use NONE or REQUIRE. However! In this case, REQUIRE is what we’ll want, as we want our server to verify the other servers are valid.
That leads us nicely to the trusted_dir and revoked_dir settings – the trusted_dir allows us to say which certificates we will trust to connect to the server. In our case this is the other two servers. The revoked_dir does the opposite (no surprises there!) – if you put a certificate in there, the server will reject any requests from that client. Typically, you’ll be using that folder when you get new certificates for your server and retire the old ones.
So, we want to put our certificates into the certificates/cluster folder – so let’s do that
At this stage, I like to start the server. Only the one I’ve been working on, the reason is to see if the server can start. If you have the password/file locations wrong, you’ll see it fail here, and, I prefer to run it in console mode – as I’m going to be shutting it down straight away, so there’s no real need to run it as a service.
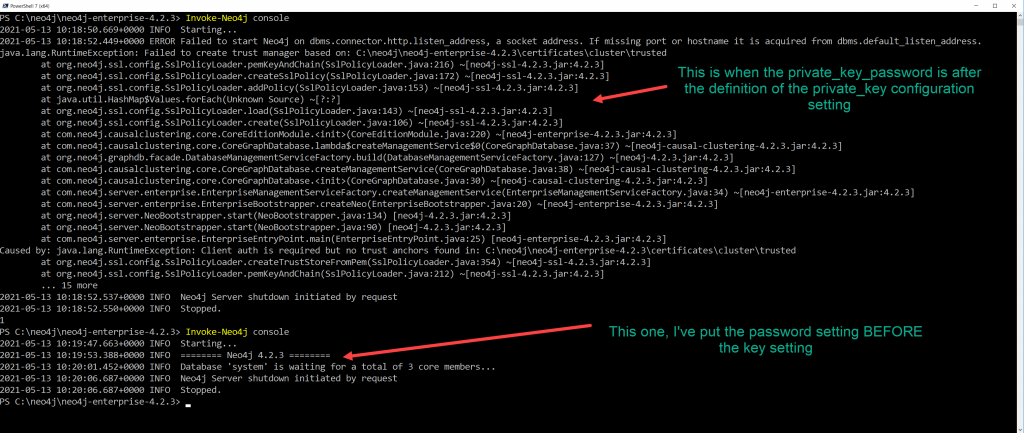
In the above picture, we have two attempts to run the server, in the first, where it can’t start, I’ve purposely put the password setting in the wrong place to show how the server won’t start. In the second one, you can see it starts and waits for 3 cluster members.
At this stage, we know our server will start – so that’s good. My next process would be to do this on the other 2 servers, so I have 3 servers all able to start with their own certificates… So I’ll just do that now.
Once they’re all able to start, we can try running all 3.
What you should notice is that they just sit there, waiting for a total of 3 core members. This is because each member is trying to ‘trust’ each other one, but it can’t because it has no knowledge of the identity of the other servers. Server 2 is connecting to server 1, but server 1 is all “Who are you? and why are you bugging me!” (we’ve all been there).
Let’s do some introductions!
Because it’s easier to see this working, we’ll setup ALL 3 servers at the same time…
The folder we’re interested in is the ‘trusted’ folder, and what we want to do is put the public keys for the other servers in that folder. In a .pem format.
.PEM?
That’s right – another format, we have a .CRT and a .KEY file, but now we need a .PEM? What?
Don’t worry – the .CRT file is actually a .PEM file (structurally at least) – so (and this is a ‘cheat’ way) – get all your .CRT files in one folder (certificate_c1, c2, c3) and rename them all to .PEM – then ahem copy all 3 to the ‘trusted’ folder of each of your servers.
Best practice – you’d want to only have the ‘other’ servers in the trusted, i.e. if you’re on server 1, you’d only have 2 and 3 in trusted. Having all 3 I guess is a security risk, if something can pretend to be one of your servers somehow, though I would imagine Neo4j is checking it’s not being connected to by itself, unfortunately I don’t have the skillz to check this.
Once we’ve got the certs in the right places, we can restart (or just start) our servers – and we should see things like in the screenshot below:
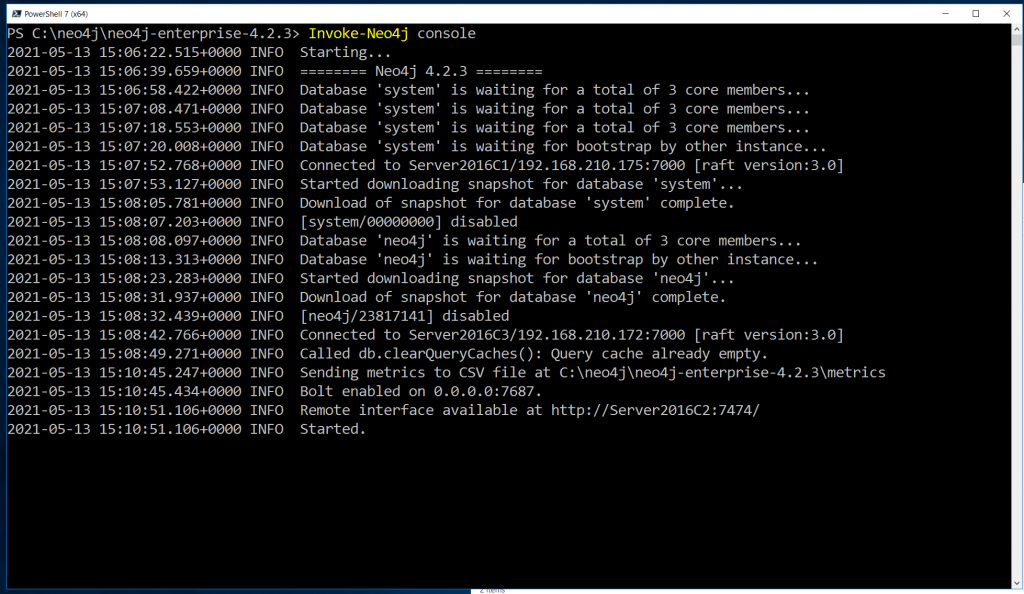
This shows a successful server start up, each server would look slightly different, as the order of which server takes precedence will affect the text displayed.
In the text there, you can see two lines:
Connected to Server2016C1/192.168.210.175:7000 [raft version:3.0]
Connected to Server2016C3/192.168.210.172:7000 [raft version:3.0]
These indicate the server we’re on (C2) has made a connection to the two other servers. But the line we’re really looking for is:
Remote interface available at http://Server2016C2:7474/
As this means our server is up and running. Once we see that, we’re all good to go!
Tips for Non-Self Signed Certificate debugging
When setting up the intra-cluster comms with proper CA signed certs, you might get to a point where everything looks ok, but it’s not starting. At this point you should verify a few things:
- Your
.pemfiles contain the FULL chain (from server, to intermediary to server) – you can check by just opening the.pemfile in a text editor, and see if you have more than one certificate in there. Typically, 1 certificate normally indicates a problem. - Use openssl to verifiy the ports – run
openssl s_client -connect <server>:7000
This will tell you if you have a certificate there, and (handily) if it’s self signed or not, read through the output, and you can see if the chain has things you don’t expect. - You might need to add your CA root to Java’s trusted certs – why? Because Java doesn’t use the OS trusted certs store, no, that would be easy. The tool is
keytool– and search online for how to use it – as it’s going to be a lot more informative that I can give you.
The end!
OK, so you should have a server running now, remember we only set up intra-cluster comms, not Bolt/HTTPS etc – those will want to be from a trusted CA – and if that is self generated – remember that Browsers (Edge, Chrome etc) will use the OS certificate stores, things like cypher-shell will use Java’s so – you might need to add it to both the OS and Java stores.
Could you achieve all of the above with a single cert using Subject Alternate Name (SAN) fields instead of individual certs using a common name?
I guess yes, I’m not sure what Java does with respect to the ‘validating’ domains from the SAN fields.
It would be something to experiment with I guess.
Personally, I like having the certs per server – that way if I need to remove one, I don’t have to redeploy my certs to every server, but just move that one into ‘revoked’.